How to install the 180mm Sandwich Panel Wall on a wooden frame?
As a supplier of 180mm Sandwich Panel Walls, I am frequently asked about the installation process on a wooden frame. This blog post aims to provide a comprehensive guide on how to install these panels effectively, ensuring a sturdy and long - lasting wall structure.
Pre - installation Preparations
Before you start the installation, it is crucial to make thorough preparations. First, you need to ensure that the wooden frame is in good condition. Check for any signs of rot, damage, or warping. The wooden frame should be straight and level, as any irregularities can lead to problems during panel installation and affect the overall stability of the wall.
Measure the dimensions of the wooden frame accurately. This will help you determine the number of 180mm Sandwich Panel Walls you need. It is advisable to order a few extra panels to account for any cutting errors or unforeseen circumstances.
Gather all the necessary tools for the installation. These typically include a circular saw for cutting the panels to size, a drill with appropriate bits for making holes in the wooden frame and panels, screws or nails for fastening the panels, a tape measure for accurate measurements, a level to ensure the panels are installed vertically and horizontally, and a utility knife for trimming any excess material.
Panel Selection
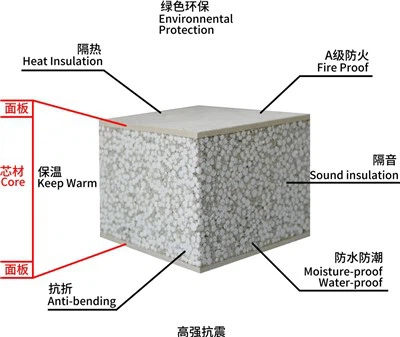
When choosing the 180mm Sandwich Panel Walls, consider the specific requirements of your project. We offer a variety of options, such as the EPS Cement Concrete Sandwich Panel, which provides excellent strength and durability. The EPS Insulation Panels are ideal if you are looking for good thermal insulation properties. And for areas where water resistance is a concern, the Waterproof EPS Sandwich Panel is a great choice.
Marking the Installation Points
Once you have the wooden frame ready and the panels selected, start by marking the installation points on the wooden frame. Use a tape measure and a pencil to mark the locations where the panels will be attached. Make sure the marks are evenly spaced and aligned properly. This will help ensure that the panels are installed in a straight and uniform manner.
Cutting the Panels
If the panels need to be cut to fit the dimensions of the wooden frame, use a circular saw. Wear appropriate safety gear, such as safety glasses and gloves, when operating the saw. Measure the length and width of the area on the wooden frame where the panel will be installed, and then mark the panel accordingly. Make slow and steady cuts along the marked lines to ensure a clean and accurate cut.
Installing the First Panel
Begin the installation process by placing the first panel against the wooden frame at the marked location. Use a level to check if the panel is vertical and horizontal. Once the panel is in the correct position, drill holes through the panel and into the wooden frame. The size of the holes should match the size of the screws or nails you will be using for fastening.
Insert the screws or nails into the holes and tighten them securely. Make sure not to overtighten, as this can damage the panel. Work your way around the perimeter of the panel, fastening it to the wooden frame at regular intervals.
Installing Subsequent Panels
After the first panel is installed, proceed to install the subsequent panels. Align the edges of the new panel with the previously installed panel. There are usually interlocking mechanisms on the panels that help ensure a tight fit. Use the same process of drilling holes and fastening the panels to the wooden frame.
Check the alignment and level of each panel as you install it. If necessary, make adjustments to ensure that the entire wall is straight and level. As you work your way up the wall, you may need to cut panels to fit the top or bottom sections of the wooden frame.


Sealing the Joints
Once all the panels are installed, it is important to seal the joints between the panels. This helps prevent air and water infiltration and improves the overall insulation and weather - resistance of the wall. Use a suitable sealant, such as a silicone - based sealant, and apply it along the joints. Smooth out the sealant with a putty knife or a similar tool to ensure a neat finish.
Finishing Touches
After the joints are sealed, you can add any finishing touches to the wall. This may include painting the panels, adding trim, or installing decorative elements. Make sure to choose materials that are compatible with the 180mm Sandwich Panel Walls.
Maintenance and Care
To ensure the longevity of the 180mm Sandwich Panel Wall, regular maintenance is required. Inspect the wall periodically for any signs of damage, such as cracks, loose panels, or damaged sealant. Repair any issues promptly to prevent further damage.
Clean the panels regularly using a mild detergent and water. Avoid using abrasive cleaners or tools that can scratch the surface of the panels.
Contact for Procurement
If you are interested in purchasing our 180mm Sandwich Panel Walls or have any questions about the installation process, please feel free to contact us. We are committed to providing high - quality products and excellent customer service. Our team of experts is ready to assist you with your project and help you make the right choices.
References
- Building Construction Handbook, various editions
- Manufacturer's installation guides for 180mm Sandwich Panel Walls