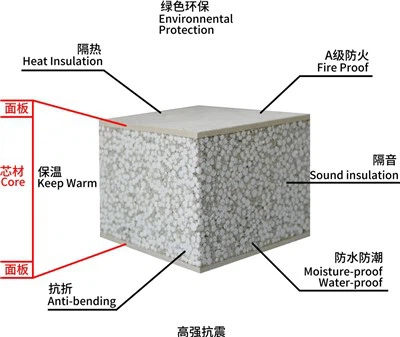

Installing fiber cement sandwich panels on a brick wall is a practical and efficient way to enhance the functionality and aesthetics of a building. As a supplier of high - quality Fiber Cement Sandwich Panels, I'm here to guide you through the entire installation process.
1. Preparation
1.1 Tools and Materials
Before you start the installation, gather all the necessary tools and materials. You will need measuring tools such as a tape measure to ensure accurate dimensions, a level to make sure the panels are installed straight, a saw for cutting the panels to the required size, a drill for making holes, screws or nails for fastening the panels, and a caulking gun for sealing. In terms of materials, of course, you need the fiber cement sandwich panels. We offer a variety of options, including the 120mm EPS Cement Sandwich Panel, 90mm EPS Concrete Sandwich Board, and Fireproof Foamed EPS Sandwich Panel.
1.2 Surface Preparation
The brick wall surface must be clean, dry, and free of any debris, dust, or loose bricks. Use a wire brush to remove any loose mortar or dirt. Check the wall for any unevenness. If there are significant irregularities, you may need to use a plaster or leveling compound to create a smooth surface. This step is crucial as an uneven surface can lead to gaps between the panels and the wall, affecting the overall installation quality.
2. Measuring and Cutting
2.1 Measuring the Wall
Measure the height and width of the brick wall accurately. Divide the wall into sections based on the size of the fiber cement sandwich panels. Leave a small gap (usually around 5 - 10mm) between the panels for expansion and contraction due to temperature changes. Mark the layout on the wall using a chalk line or a pencil.
2.2 Cutting the Panels
If the panels need to be cut to fit the wall dimensions, use a saw. A circular saw with a fine - tooth blade is recommended for clean and precise cuts. When cutting, wear appropriate safety equipment such as goggles and a dust mask to protect yourself from dust and debris. Measure twice and cut once to avoid any waste of materials.
3. Installation of Panels
3.1 Starting from the Bottom
Begin the installation from the bottom of the wall. Position the first panel against the wall at the marked location. Use a level to ensure it is perfectly horizontal. Drill holes through the panel and into the brick wall at regular intervals. The spacing of the holes depends on the size and weight of the panel, but generally, a spacing of 300 - 400mm is appropriate.
3.2 Fastening the Panels
Insert screws or nails into the drilled holes to secure the panel to the wall. Make sure the fasteners are tight enough to hold the panel firmly in place but not so tight that they damage the panel. For a more secure installation, you can also use construction adhesive between the panel and the wall. Apply the adhesive in a zig - zag pattern on the back of the panel before placing it against the wall.
3.3 Continuing the Installation
Once the first panel is installed, place the next panel adjacent to it. Align the edges carefully to ensure a seamless joint. Use a spacer to maintain the expansion gap between the panels. Repeat the process of drilling holes and fastening the panels until the entire wall is covered.
4. Sealing and Finishing
4.1 Sealing the Joints
After all the panels are installed, seal the joints between the panels using a silicone caulk. This helps to prevent water infiltration, air leakage, and provides a finished look. Apply the caulk evenly along the joints and use a putty knife to smooth it out.
4.2 Trimming and Edging
Trim any excess panel material at the edges of the wall using a saw. You can also install edge trims to give the installation a more professional appearance. Edge trims are available in various materials and colors to match the panels.
5. Quality Check
5.1 Visual Inspection
Conduct a visual inspection of the installed panels. Check for any gaps, unevenness, or loose fasteners. Make sure the joints are well - sealed and the panels are firmly attached to the wall.
5.2 Functionality Check
Test the functionality of the installed panels. Check for any signs of water leakage during a light rain or by spraying water on the wall. Ensure that the panels provide the expected insulation and sound - proofing properties.
6. Advantages of Using Our Fiber Cement Sandwich Panels
Our fiber cement sandwich panels offer several advantages. Firstly, they have excellent insulation properties, which can help reduce energy consumption in the building. The EPS core in our 120mm EPS Cement Sandwich Panel and 90mm EPS Concrete Sandwich Board provides good thermal insulation, keeping the interior of the building warm in winter and cool in summer.


Secondly, our panels are fire - resistant. The Fireproof Foamed EPS Sandwich Panel is designed to meet high - level fire safety standards, providing an extra layer of protection for the building.
In addition, fiber cement sandwich panels are durable and low - maintenance. They are resistant to weathering, moisture, and pests, ensuring a long service life with minimal upkeep.
7. Conclusion
Installing fiber cement sandwich panels on a brick wall is a relatively straightforward process if you follow the steps outlined above. With proper preparation, accurate measurement, and careful installation, you can achieve a high - quality and functional installation.
If you are interested in purchasing our fiber cement sandwich panels for your project, we invite you to contact us for more information and to discuss your specific requirements. Our team of experts is ready to assist you in choosing the right panels and providing any technical support you may need.
References
- Building Construction Handbook, 5th Edition
- Guide to Insulation Materials and Installation, 3rd Edition