
Installing lightweight partition wall panels in a curved hallway can be a challenging yet rewarding project. As a supplier of Lightweight Partition Wall Panels, I've witnessed firsthand the transformative power of these panels in both residential and commercial settings. In this blog post, I'll guide you through the process of installing these panels in a curved hallway, sharing valuable insights and tips along the way.
Understanding Lightweight Partition Wall Panels
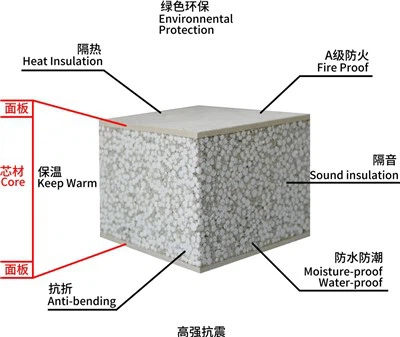
Before we dive into the installation process, let's take a moment to understand what lightweight partition wall panels are. These panels are typically made from materials such as expanded polystyrene (EPS), fiber cement, or a combination of both. They offer several advantages over traditional wall construction methods, including ease of installation, cost-effectiveness, and excellent insulation properties.
One of our popular products is the EPS Cement Waterproof Wall Panels for Hospital. These panels are specifically designed for use in hospitals and other healthcare facilities, where hygiene and durability are of utmost importance. They are waterproof, fire-resistant, and easy to clean, making them an ideal choice for these environments.
Another option is our 120mm EPS Wall Panels. These panels are thicker and offer enhanced insulation properties, making them suitable for use in areas where temperature control is a concern. They are also lightweight and easy to handle, making installation a breeze.
For those looking for a more versatile option, our Fiber Cement Sandwich Panel is a great choice. These panels are made from a combination of fiber cement and EPS, offering the best of both worlds. They are strong, durable, and resistant to fire, moisture, and pests, making them suitable for a wide range of applications.
Preparing for Installation
The first step in installing lightweight partition wall panels in a curved hallway is to prepare the area. This involves measuring the hallway to determine the amount of panels needed and ensuring that the surface is clean, level, and free of any debris. You'll also need to mark the location of the panels on the floor and ceiling, using a chalk line or a laser level.
Next, you'll need to gather the necessary tools and materials. This includes a saw, a drill, a hammer, a measuring tape, a level, and a utility knife. You'll also need to purchase the appropriate fasteners, such as screws, nails, or adhesive, depending on the type of panels you're using.
Cutting the Panels
Once you have the panels and tools ready, it's time to cut the panels to size. This is where things can get a bit tricky, especially when working with a curved hallway. To ensure a precise cut, you'll need to use a saw that is designed for cutting lightweight partition wall panels. A circular saw or a jigsaw with a fine-tooth blade is a good choice.
When cutting the panels, it's important to take your time and make sure that the cuts are straight and accurate. You may need to make multiple cuts to achieve the desired shape, especially if the curve is tight. It's also a good idea to use a template or a pattern to guide your cuts, especially if you're not experienced with cutting curved shapes.
Installing the Panels
Once the panels are cut to size, it's time to install them. Start by attaching the first panel to the floor and ceiling using the appropriate fasteners. Make sure that the panel is level and plumb, and that it is securely attached to the surface. You may need to use a level and a hammer to adjust the panel as needed.
Next, attach the remaining panels to the first panel, using the same method. Make sure that the panels are aligned properly and that there are no gaps between them. You may need to use a spacer or a shim to ensure a tight fit.
As you install the panels, it's important to check the alignment and level frequently to ensure that the wall is straight and plumb. You may also need to make adjustments to the panels as you go, especially if the curve is not perfectly smooth.
Finishing the Installation
Once all the panels are installed, it's time to finish the installation. This involves filling any gaps or holes between the panels with caulk or spackle, and sanding the surface smooth. You can then paint or wallpaper the panels to match the surrounding decor.
Tips and Tricks
Installing lightweight partition wall panels in a curved hallway can be a challenging project, but with the right tools and techniques, it can be done successfully. Here are some tips and tricks to help you get the job done right:


- Use a template or a pattern: As mentioned earlier, using a template or a pattern can help you achieve a precise cut, especially when working with a curved hallway. You can create a template using cardboard or plywood, or you can purchase a pre-made template from a home improvement store.
- Take your time: Installing lightweight partition wall panels is a time-consuming process, especially when working with a curved hallway. It's important to take your time and make sure that each step is done correctly. Rushing through the process can result in a poor-quality installation.
- Use the right tools: Using the right tools is essential for a successful installation. Make sure that you have a saw, a drill, a hammer, a measuring tape, a level, and a utility knife on hand. You may also need to purchase some specialized tools, such as a jigsaw or a circular saw, depending on the type of panels you're using.
- Get help: Installing lightweight partition wall panels in a curved hallway can be a two-person job, especially when working with large panels. It's a good idea to get some help from a friend or a family member to make the process easier and safer.
Conclusion
Installing lightweight partition wall panels in a curved hallway can be a challenging yet rewarding project. By following the steps outlined in this blog post and using the tips and tricks provided, you can achieve a professional-looking installation that will enhance the beauty and functionality of your hallway.
If you're interested in purchasing lightweight partition wall panels for your project, please don't hesitate to contact us. We offer a wide range of panels to choose from, and our team of experts can help you select the right panels for your needs. We also provide installation services, so you can rest assured that your project will be completed to the highest standards.
References
- "Lightweight Partition Wall Panels: A Comprehensive Guide." Home Improvement Magazine, 2023.
- "How to Install Lightweight Partition Wall Panels in a Curved Hallway." DIY Network, 2023.
- "Tips and Tricks for Installing Lightweight Partition Wall Panels." This Old House, 2023.