
Hey there! As a supplier of EPS Cement Sandwich Wall Panels, I've got a ton of experience with these bad boys, especially when it comes to installing them in cold - storage buildings. In this blog, I'm gonna walk you through the whole process, from start to finish.
Why EPS Cement Sandwich Wall Panels for Cold - Storage Buildings
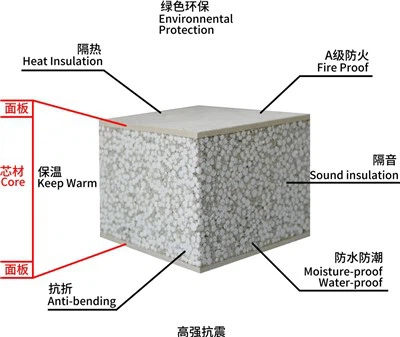
First off, let's talk about why these panels are such a great choice for cold - storage. EPS (Expanded Polystyrene) is an excellent insulator. It can keep the cold air inside the cold - storage building and prevent the warm air from getting in. The cement outer layers add strength and durability to the panels. They can withstand the rigors of a cold - storage environment, including temperature fluctuations and potential impacts.
There are different types of EPS sandwich panels that you might be interested in. For example, the Waterproof EPS Sandwich Panel is great if you're worried about moisture issues in the cold - storage. And the EPS Cement Sandwich Insolation Board offers enhanced insulation properties. The EPS Cement Concrete Sandwich Panel is a super - strong option that can handle heavy loads.
Pre - installation Preparation
Before you start installing the EPS Cement Sandwich Wall Panels, you need to do some prep work.
Site Inspection
Take a good look at the cold - storage building site. Make sure the foundation is level and in good condition. Any unevenness in the foundation can cause problems during installation and affect the performance of the panels later on. Check for any signs of cracks, moisture, or other damage. If there are any issues, you need to fix them before proceeding.
Measuring and Planning
Measure the area where you're going to install the panels. This will help you determine how many panels you need. Make a detailed plan of how the panels will be arranged. Consider things like door and window openings, ventilation ducts, and any other structural elements in the cold - storage. It's important to plan ahead to avoid any last - minute headaches.
Gathering Tools and Materials
You'll need a few tools for the installation. These include a saw for cutting the panels to size, a drill for making holes, a level to ensure the panels are straight, and a fastener gun for attaching the panels. Also, make sure you have all the necessary fasteners, such as screws and brackets.
Installation Process
Step 1: Install the Bottom Track
Start by installing the bottom track along the foundation of the cold - storage building. Use a level to make sure the track is perfectly straight. Secure the track to the foundation using the appropriate fasteners. This track will serve as the base for the panels and keep them in place.
Step 2: Cut the Panels to Size
Based on your measurements and plan, use a saw to cut the EPS Cement Sandwich Wall Panels to the right size. Be careful when cutting to ensure clean edges. You can use a straightedge to guide the saw for a more precise cut.
Step 3: Install the Panels
Begin installing the panels one by one in the bottom track. Make sure the panels fit snugly together. Use a level to check that each panel is vertical. As you install the panels, use a fastener gun to attach them to the track and to each other. You may need to drill holes in the panels for the fasteners in some cases.
Step 4: Handle Door and Window Openings
When you reach the areas for door and window openings, cut the panels accordingly. You can use a jigsaw for more intricate cuts. Make sure the edges around the openings are smooth and properly sealed to prevent air and moisture leakage.
Step 5: Install the Top Track
Once all the panels are installed, install the top track. This will help to secure the panels at the top and provide additional support. Attach the top track to the panels using fasteners.


Step 6: Seal the Joints
After the panels and tracks are installed, seal the joints between the panels using a suitable sealant. This will help to prevent air and moisture from seeping through the joints, which is crucial for maintaining the temperature inside the cold - storage.
Post - installation Checks
Once the installation is complete, do a thorough check. Make sure all the panels are securely attached and there are no loose fasteners. Check the seals around the joints, door, and window openings to ensure they are intact. Use a thermal imaging camera to check for any heat leaks. If you find any issues, fix them right away.
Maintenance Tips
To keep your EPS Cement Sandwich Wall Panels in good condition, you need to do some regular maintenance. Clean the panels periodically to remove any dirt or debris. Check the seals and fasteners regularly for signs of wear and tear. Replace any damaged seals or fasteners as soon as possible to prevent further problems.
Conclusion
Installing EPS Cement Sandwich Wall Panels in a cold - storage building is a great way to ensure energy efficiency and durability. By following the steps I've outlined in this blog, you can have a successful installation. If you're interested in purchasing these panels for your cold - storage project, don't hesitate to reach out. We're here to help you with all your EPS Cement Sandwich Wall Panel needs. Whether you have questions about the installation process or need advice on which type of panel is best for your situation, we've got the expertise to assist you.
References
- Building Construction Handbook for Cold - Storage Facilities
- EPS Sandwich Panel Installation Guidelines