Hey there! As a supplier of Exterior Wall Sandwich Panels, I often get asked about how to install electrical wiring on these panels. It's a crucial aspect, especially when you're looking to set up a functional and safe building. So, let's dive right into it and break down the process step by step.
Understanding Exterior Wall Sandwich Panels
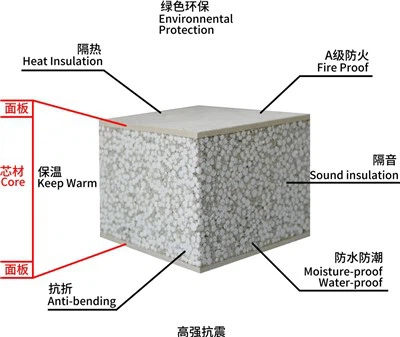
First things first, let's talk a bit about exterior wall sandwich panels. These panels are awesome because they offer great insulation, are lightweight, and are relatively easy to install. They usually consist of two outer layers with an insulating core in the middle. There are different types, like the 90mm EPS Concrete Sandwich Board, Calcium Silicate Partition Wall, and Polystyrene Wall Panels. Each type has its own unique properties, but the general process of installing electrical wiring remains somewhat similar.
Planning the Wiring
Before you start drilling holes and running wires, you need to have a solid plan. This involves figuring out where you want your electrical outlets, switches, and lights to be. Take a good look at the layout of the building and mark the locations on the exterior wall sandwich panels. Make sure to consider the functionality and convenience of the electrical points. For example, you don't want to place an outlet in a spot where it'll be blocked by furniture later on.


It's also important to check the local electrical codes and regulations. These rules are in place to ensure the safety of the wiring installation. They'll tell you things like the minimum distance between outlets, the type of wiring to use, and how to properly ground the system. Ignoring these codes can lead to serious problems down the line, so don't skip this step!
Gathering the Tools and Materials
Once you have your plan in place, it's time to gather the tools and materials you'll need. Here's a basic list to get you started:
- Wiring: Choose the appropriate type of electrical wire based on the load and the distance it needs to travel. Make sure it's rated for outdoor use if the exterior wall is exposed to the elements.
- Conduits: Conduits are protective tubes that house the wiring. They help prevent damage from physical impact, moisture, and pests. You can use PVC or metal conduits, depending on your needs.
- Electrical Boxes: These are used to house the outlets, switches, and junction points. Make sure they're the right size and type for the job.
- Drill and Bits: You'll need a drill to make holes in the exterior wall sandwich panels for the conduits and electrical boxes. Use the appropriate drill bits for the material of the panels.
- Screwdriver Set: A set of screwdrivers will come in handy for installing the electrical boxes and connecting the wires.
- Wire Strippers: These are used to remove the insulation from the ends of the wires so you can make proper connections.
- Voltage Tester: A voltage tester is essential for checking if the wires are live before you start working on them. This helps prevent electrical shocks.
Installing the Conduits and Electrical Boxes
Now that you have everything you need, it's time to start installing the conduits and electrical boxes. Here's how you can do it:
- Mark the Holes: Using the markings on the exterior wall sandwich panels, mark the locations where you'll drill the holes for the conduits and electrical boxes. Make sure the holes are the right size and depth for the components you're using.
- Drill the Holes: Use the drill and the appropriate drill bits to make the holes. Be careful not to drill too deep or too close to the edges of the panels, as this can cause damage.
- Install the Conduits: Insert the conduits into the holes and secure them in place using conduit straps or brackets. Make sure the conduits are straight and properly aligned.
- Install the Electrical Boxes: Place the electrical boxes in the holes and secure them to the exterior wall sandwich panels using screws. Make sure the boxes are flush with the surface of the panels.
Running the Wiring
Once the conduits and electrical boxes are installed, it's time to run the wiring. Here's a step-by-step guide:
- Cut the Wires: Measure and cut the electrical wires to the appropriate lengths. Leave some extra length at each end to make the connections easier.
- Pull the Wires Through the Conduits: Use a fish tape or a wire pulling tool to pull the wires through the conduits. Be careful not to damage the wires as you're pulling them.
- Connect the Wires: Once the wires are in place, connect them to the electrical boxes and the outlets, switches, or lights. Make sure to follow the wiring diagram and use the proper connectors.
- Test the Wiring: Before you close up the electrical boxes, use a voltage tester to check if the wiring is working properly. This will help you identify any problems early on and make the necessary repairs.
Making the Final Connections
After the wiring is installed and tested, it's time to make the final connections. This involves connecting the electrical system to the main power source. If you're not familiar with this process, it's best to hire a licensed electrician to do it for you. They have the knowledge and experience to ensure that the connections are made safely and correctly.
Sealing and Protecting the Wiring
Once the wiring is installed and connected, it's important to seal and protect it to prevent damage from moisture, pests, and other environmental factors. Here's what you can do:
- Seal the Conduits: Use silicone caulk or another appropriate sealant to seal the ends of the conduits. This will prevent water and pests from entering the conduits.
- Cover the Electrical Boxes: Install covers on the electrical boxes to protect the outlets, switches, and junction points. Make sure the covers are weatherproof if the exterior wall is exposed to the elements.
- Inspect the Wiring Regularly: Periodically inspect the wiring to check for any signs of damage or wear. If you notice any problems, make the necessary repairs as soon as possible.
Conclusion
Installing electrical wiring on exterior wall sandwich panels may seem like a daunting task, but with the right planning, tools, and materials, it can be done safely and effectively. Remember to follow the local electrical codes and regulations, and don't hesitate to seek professional help if you're not sure about something.
If you're in the market for high-quality exterior wall sandwich panels, we've got you covered. Our panels are made from top-notch materials and are designed to meet the highest standards of quality and performance. Whether you need 90mm EPS Concrete Sandwich Board, Calcium Silicate Partition Wall, or Polystyrene Wall Panels, we have a wide range of options to choose from.
If you're interested in purchasing our exterior wall sandwich panels or have any questions about the installation process, feel free to reach out to us. We'd be happy to assist you with your project and help you find the perfect solution for your needs.
References
- National Electrical Code (NEC)
- Electrical Wiring Handbook by Mike Holt