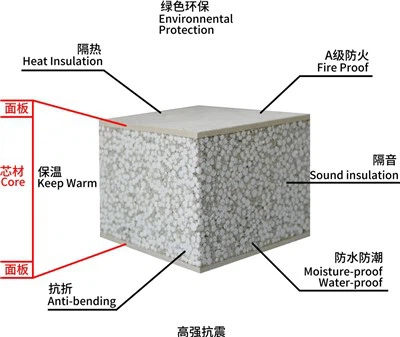

Hey there! I'm a supplier of 120mm EPS wall panels, and I'm stoked to share with you how to install these awesome panels on a plaster wall. EPS, or expanded polystyrene, is a lightweight and highly insulating material, making our 120mm EPS wall panels a top - notch choice for both residential and commercial buildings.
Pre - installation Preparation
First things first, you gotta gather all the necessary tools and materials. You'll need a measuring tape, a utility knife, a trowel, a spirit level, a drill, wall plugs, screws, and of course, the 120mm EPS wall panels. Also, make sure you've got some adhesive suitable for bonding EPS to plaster.
Before you start installing, check the plaster wall. It should be clean, dry, and free of any loose debris, paint, or grease. If there are any cracks or uneven areas, fill them with a suitable filler and let it dry completely. Use a sandpaper to smooth out any rough spots on the wall. This will ensure a good bond between the panel and the wall.
Measuring and Cutting the Panels
Measure the height and width of the area where you want to install the panels. Mark these measurements on the EPS panels using a measuring tape and a pencil. Remember, it's always better to measure twice and cut once!
When cutting the EPS panels, use a sharp utility knife. Score the panel along the marked line a few times, then snap it along the scored line. For more complex cuts, like around electrical outlets or pipes, you can use a jigsaw. Just make sure to wear safety goggles and a dust mask to protect yourself from the EPS dust.
Applying Adhesive
Now, it's time to apply the adhesive. Using a trowel, spread a layer of adhesive on the back of the EPS panel. Make sure to cover the entire surface evenly, but don't go overboard. You want just enough to create a strong bond.
You can apply the adhesive in a zig - zag pattern or in small dots, depending on the type of adhesive you're using. Some adhesives come with specific application instructions, so make sure to read them carefully.
Installing the Panels
Place the panel with the adhesive side against the plaster wall. Start from the bottom corner and work your way up. Use a spirit level to make sure the panel is perfectly vertical and horizontal. Press the panel firmly against the wall to ensure good contact with the adhesive.
If you're installing multiple panels, align them carefully with each other. You can use a spacer between the panels to create a uniform gap for the jointing material. Once the panel is in place, use a drill to insert wall plugs and screws at regular intervals around the perimeter of the panel. This will provide additional support and hold the panel securely in place.
Jointing the Panels
After all the panels are installed, it's time to joint them. You can use a jointing compound specifically designed for EPS panels. Apply the compound to the gaps between the panels using a trowel. Smooth out the compound with a putty knife to create a seamless finish.
Let the jointing compound dry completely before sanding it down to make it smooth. This will give your wall a professional look.


Finishing Touches
Once the jointing compound is dry and sanded, you can apply a finish to the EPS wall panels. You can paint them with a suitable paint, or you can apply a decorative coating. Make sure to choose a finish that is compatible with EPS material.
Benefits of 120mm EPS Wall Panels
There are so many reasons why 120mm EPS wall panels are a great choice. They offer excellent insulation, which can help reduce your energy bills by keeping your building warm in the winter and cool in the summer. They are also lightweight, which makes them easy to handle and install.
EPS is a durable material that can withstand wear and tear, and it's resistant to moisture, mold, and mildew. This means your wall will look great and stay in good condition for a long time.
Other Related Products
If you're interested in other types of EPS panels, we also offer EPS Cement Seismic Panel, which are designed to provide extra seismic resistance. And our 100mm Prefabricated Insulated Wall Panels are a great option if you need a thinner panel. Also, check out our Waterproof EPS Sandwich Panel for areas where water resistance is a concern.
Wrapping Up
Installing 120mm EPS wall panels on a plaster wall might seem like a big job, but if you follow these steps, it can be a breeze. These panels are a great investment for any building, offering insulation, durability, and a great look.
If you're thinking about purchasing 120mm EPS wall panels or any of our other products, I'd love to chat with you. Whether you're a contractor, a homeowner, or a business owner, we can provide you with high - quality panels at competitive prices. Reach out to us to start a conversation about your project and get a quote. Let's work together to make your building more energy - efficient and beautiful!
References
- Building Insulation Handbook: Covers general principles of insulation and installation techniques.
- EPS Installation Guide: Published by industry associations, provides specific guidelines for EPS panel installation.