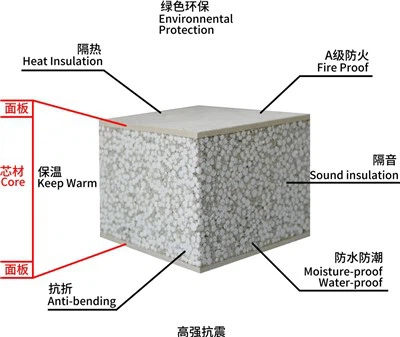

As a supplier of EPS sandwich panels, I understand the critical importance of ensuring the flatness during the installation process. Flatness not only affects the aesthetic appearance of the final construction but also plays a significant role in the structural integrity and functionality of the building. In this blog, I will share some key strategies and considerations to help you achieve optimal flatness when installing EPS sandwich panels.
Pre - installation Preparation
Site Inspection
Before starting the installation, a thorough site inspection is essential. Check the foundation or the surface where the EPS sandwich panels will be installed. Any unevenness in the foundation can directly transfer to the panels, leading to an uneven finish. Use a leveling instrument to measure the flatness of the surface. If there are any bumps, depressions, or slopes beyond the acceptable tolerance, they should be corrected. For example, if the foundation has a small depression, it can be filled with a suitable leveling compound. If it has a large slope, it may require more extensive work such as re - grading or building a new sub - structure.
Panel Selection
Choose high - quality EPS sandwich panels from a reliable source. Inferior panels may have internal defects or uneven surfaces, which can make it difficult to achieve flatness during installation. As an EPS sandwich panel supplier, I always recommend our customers to select panels that meet industry standards. For instance, the EPS Cement Waterproof Wall Panels for Hospital we offer are carefully manufactured to ensure a smooth and even surface. These panels are made with precision, which provides a good starting point for a flat installation.


Tools and Equipment
Ensure that you have the right tools and equipment for the job. A laser level is an invaluable tool for ensuring horizontal and vertical alignment. It can project a straight line across the installation area, allowing you to easily identify any deviations. Other essential tools include a tape measure, a spirit level, and a rubber mallet. The tape measure is used to measure distances accurately, the spirit level helps to check the levelness of individual panels, and the rubber mallet can be used to gently adjust the position of the panels without causing damage.
Installation Process
Layout Planning
Before installing the panels, create a detailed layout plan. Mark the position of each panel on the foundation or the supporting structure. This helps to ensure that the panels are installed in a straight and orderly manner. Consider the size and shape of the panels, as well as any openings for doors, windows, or ventilation systems. Make sure that the panels are arranged in a way that minimizes the need for cutting or trimming, as improper cutting can lead to uneven edges.
Panel Alignment
When installing the first panel, use the laser level to ensure that it is perfectly vertical and horizontal. Secure the panel firmly to the foundation or the supporting structure using the appropriate fasteners. Once the first panel is in place, it serves as a reference for the rest of the installation. Align the subsequent panels with the first one, making sure that there are no gaps or overlaps between them. Use a spirit level to check the levelness of each panel as you install it. If a panel is slightly out of alignment, use a rubber mallet to gently tap it into place.
Joint Treatment
The joints between the EPS sandwich panels are critical for maintaining flatness. Make sure that the joints are tight and even. There are different types of joint systems available, such as tongue - and - groove joints or butt joints. Each type has its own installation requirements. For example, tongue - and - groove joints need to be carefully aligned to ensure a proper fit. After the panels are installed, apply a suitable sealant to the joints to prevent water infiltration and to provide additional structural support. A well - sealed joint also helps to create a smooth and continuous surface.
Support and Bracing
During the installation process, provide adequate support and bracing for the panels. This is especially important for large - scale installations or when the panels are installed on a vertical surface. Use temporary supports such as props or scaffolding to hold the panels in place until they are fully secured. The supports should be adjusted as needed to maintain the flatness of the panels. For example, if a panel starts to sag under its own weight, adjust the support to lift it back into position.
Post - installation Checks
Visual Inspection
After the installation is complete, conduct a visual inspection of the entire installation area. Look for any visible signs of unevenness, such as bumps, dents, or wavy surfaces. Check the joints between the panels to ensure that they are still tight and even. If you notice any issues, mark them for further investigation.
Measurement Checks
Use a measuring tool such as a straightedge or a laser scanner to measure the flatness of the installed panels. Place the straightedge across the panels and check for any gaps between the straightedge and the panel surface. A laser scanner can provide a more accurate and detailed measurement of the surface profile. Compare the measurements with the specified flatness tolerance for the project. If the flatness does not meet the requirements, determine the cause of the problem and take corrective action.
Rectification of Issues
If any unevenness is detected, take appropriate measures to rectify the problem. This may involve adjusting the fasteners, adding or removing support, or replacing a damaged panel. For example, if a panel is slightly warped, you may be able to remove it and replace it with a new one. If the problem is due to improper installation, carefully re - install the affected panels following the correct procedures.
Conclusion
Ensuring the flatness of EPS sandwich panel installation is a multi - step process that requires careful planning, proper installation techniques, and thorough post - installation checks. As an EPS sandwich panel supplier, I am committed to providing high - quality panels and sharing our expertise to help our customers achieve the best results. Whether you are working on a small - scale residential project or a large - scale commercial building, following these guidelines will help you ensure a flat and professional - looking installation.
If you are interested in purchasing our EPS sandwich panels, such as the 75mm Thickness EPS Sandwich Panel or the EPS Cement Sandwich Wall Panel, please feel free to contact us for a quote and to discuss your specific requirements. We are always ready to assist you with your project and to ensure that you get the best - quality products and services.
References
- Building Construction Handbook, Various authors, McGraw - Hill Education
- EPS Sandwich Panel Installation Guidelines, Industry standards documents
- Best Practices in Panel Installation, Professional construction magazines and journals